Decoupage with napkins on wood. Decoupage instructions for beginners on wood. Decoupage in the provence style with watercolor effect.
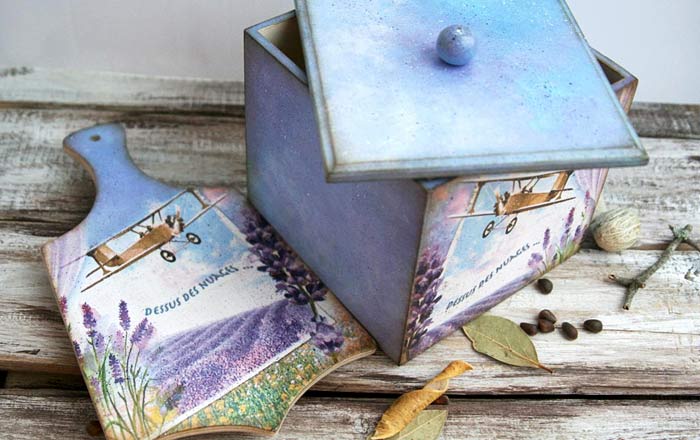
Today I will tell you how to beautifully decorate a set for the kitchen. Such a set includes a wooden box for bulk products and a wooden cutting board. Such a set will perfectly decorate your kitchen or can be an original gift. In my case, the size of the box is 14×14×14 cm, and the board is 23.5×15 cm. Today we will perform decoupage with napkins on wood.
To decorate we will need:
Table of Contents
wooden box workpieces and boards;
acrylic primer;
glue for decoupage;
a paper napkin with a pattern you like;
water sprayer;
acrylic varnish;
acrylic paints (white, blue, purple);
bitumen varnish;
sandpaper, paper napkins, dishwashing sponge, brushes, palette, 2 files.

Decoupage instructions for beginners on wood.
My workpieces are perfectly sanded, so I start priming right away. If your workpieces are a little rough, I suggest sanding them with sandpaper before priming. It is very important for decoupage with napkins on wood.

Let’s coat our workpieces with primer – the outer sides of the box, only the top of the lid of the box, only one side of the board. After complete drying, sand the box with fine sandpaper to remove lint.

Choose a napkin with the pattern you like. I chose a provence style napkin, the same for the box and for the board. You can give your imagination free rein. Decoupage with napkins on wood is a very creative process, so almost everything is up to you. My napkin will completely cover the walls of the box. If you prefer a small pattern on part of the wall, you must first paint the surface. It should match the background color of your napkin. It is important that later the difference should not be noticeable. Or you can paint the wall (background) in the color of the napkin later, as I do today.


The motif we have chosen must be torn from the rest of the napkin, not cut out, namely torn by hand. Thus, it will be easier to hide the edges of the image. Do the same with the pattern for the board. This is a very interesting part of decoupage with napkins on wood.

Take the torn out motif, and separate the bottom 2 paper layers, leaving only the colorful top layer. Next, we will glue this layer using the file technique.

To do this, take the file, put the napkin face down on it and splash it gently with water. You may notice that bubbles on the surface have formed.

To get rid of the bubbles, cover it with the file and carefully push out the excess water with your hand. Thus, you can smooth out the bubbles, moving from the center to the edges.

After that, carefully remove the top file.

Take glue for decoupage. In my case, I used this glue, but you don’t have to spend a lot of money and buy a special glue. A simple PVA glue is also fine. Next, apply the glue to the wooden surface.

Glue the napkin on top, smoothing it over the file. Carefully remove the file, leaving the napkin on the workpiece.

One side is already decorated. Do not forget to do the same with the board and the second side of the box. Dry them well for a couple of hours, sand off all the excess on the edges and proceed to decorate the remaining sides.

The sides should be the color of the sky on the napkin, with beautiful watercolor transitions from color to color. To achieve this effect, we need to mix at least 5 different colors, similar in tone. To do this, I squeeze some white paint into a palette and mix the colors I need.

We made such gentle colors, just in the tone of our sky.

To achieve smooth transitions from color to color, we will not paint with a brush, but with a sponge. To do this, I cut a small piece out of a dishwashing sponge.

Dip the sponge into the paint and apply the paint to the surface, thus changing the color of the paint. This is how we perform decoupage with napkins on wood.

Treat the entire side in this way and you will get such a result. While this part of the box is drying, we proceed to work with the board. As we remember, on the board we need to finish painting the top part. We will do it in exactly the same way, with a sponge and slapping movements, going a little farther on the napkin’s edges. In the same way, we will decorate the lid, the bottom of the box and the remaining sides.

Leave everything to dry for at least a couple of hours. After it is completely dry, the work needs to be varnished.

I paint a lot, so I bought a big jar of the most common water-based acrylic varnish for wood. You can buy varnish, both in art and construction stores.

Coat the outside of the box and the board with a coat of varnish. You can stop at this step, but we will continue to give our work an antique effect. If you decide to stop, it is necessary to cover the work with several coats of varnish, but give them time to dry.

For further work, we will need bitumen varnish, a piece of sponge, a small container for varnish (which is useless for you and can be thrown away), disposable gloves and a piece of paper.

Put on gloves, pour some varnish into the jar, and dip the sponge into the varnish.

With help of stroking motions leave excess paint on the folded sheet of paper (folded 4 times). Do this until the print is barely noticeable.
Take the workpiece and very gently, with help of stroking motions from the center to the edge, begin to process the protruding edges of the box. There should be no bright dark spots, the sponge should be almost dry. The aging effect should be barely noticeable.

Process all protruding edges, bottom, lid and board in this way. Let everything dry, preferably for a night.

The final touch is to make a splash of paint. To do this, take a brush with stiff bristles and a toothpick. Apply the paint to the brush. In my case the paint is purple. And start splashing using the brush and the toothpick. Be careful – the splatter goes far and in all directions.

You will get such a wonderful effect, it gives the work a finishing touch and at the same time adds a little bit of an antique effect. It’s better to spray with light and dark paint (I used purple and white). The thicker the paint, the smaller the splatter. Spray on all sides of the box, bottom, lid and board. The final step is to cover our workpieces with a double coat of varnish, don’t forget to treat the surface with fine sandpaper after every time you coat the workpiece. This is the decoupage with napkins on wood I wanted to tell you about.
Inside the box should not be covered with anything, thanks to this it is possible to store any food products inside of it.

We ended up with such a delicate and beautiful set for the kitchen! And now you are familiar with decoupage with napkins on wood.
See related posts


Wire wrapped tutorials PDF Valeriy Vorobev