

Nylon Mesh tubing jewelry. Nylon Mesh Tubing, aka Tubular Crin, aka Cyberlox. DIY Mesh bracelets. Trendy Nylon Mesh tubing bracelets tutorials step by step.
Introduction. Nylon Mesh tubing.
Table of Contents
Today we are going to make two different nylon mesh tubing bracelets. Each of them will have a very unique design. But there is one thing they have in common. Both bracelets are made of nylon mesh tubing.

Nowadays, you can find a lot of different nylon mesh tubing in stores. There are many different colors available. It is possible to choose nylon mesh tubing depending on the diameter you need. Nylon mesh tubing is a universal material. It can be used to make many different kinds of fashion jewelry. With all its attractiveness the price of such material will definitely surprise you even more. It is very cheap and affordable for literally everyone.
I myself started to use nylon mesh tubing for my jewelry not so long ago. But already now I can say with confidence that this material will stay in my workshop for a very long time. I have already made a lot of jewelry from this material, but new ideas keep comping to my head.

Nylon mesh tubing bracelets. We will use nylon mesh tubing and beads. Step by step tutorial for beginners.

To make the nylon mesh tubing bracelet, we will need:
Nylon mesh tubing, diameter of 8 mm
Magnetic clasp
Matching color beads.

Glue
Scissors
Funnel for filling the beads

I couldn’t find a funnel of the right size. So, I cut off the tip from an ordinary pen and inserted it tightly into the funnel. I also cut off the very tip of the pen so that the beads could fit through the hole. Now the nylon mesh tubbing will be stretched by the homemade funnel so the connection will be very tight. Thus, we can fill the nylon mesh tubbing with beads so easyeasily. Take this lifehack into consideration!
From the very beginning, you need to decide on the size of the nylon mesh tubbing bracelet. Don’t forget to take the magnetic clasp into account. Keep in mind that the ends of the nylon mesh tubbing will go inside the clasp.
Cut off the necessary size of nylon mesh tubing. Glue the first part of the magnetic closure clasp on one side. Insert the nylon mesh tubing inside.

Using a funnel, fill the beads inside the nylon mesh tubing. Tie the end of the mesh with a thread to keep the beads from spilling out. Next, you need to glue the second part of the magnetic clasp.

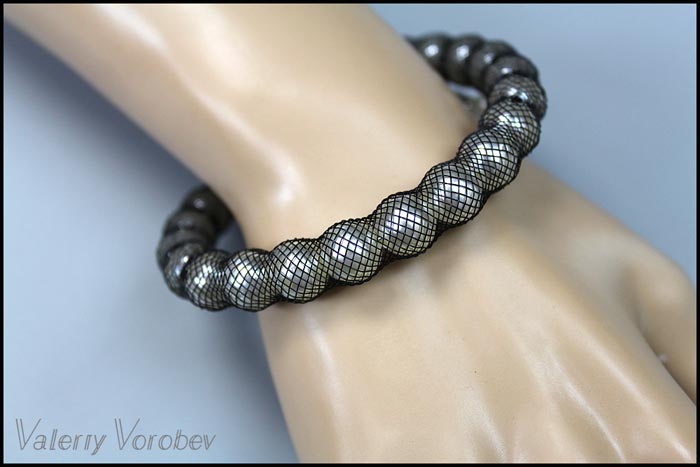
Wait for the glue to dry well. And… The nylon mesh tubing bracelet is readydone!
I put rhinestones inside the second bracelet (the photo is below).

Nylon mesh tubing Bracelet. Made of nylon mesh tubing, memory wire and beads. Step by step instructions tutorial for beginners.
To make such a cute bracelet with your own hands, we will need:
Nylon mesh tubing, 8 mm.
Two metal cone plugs for the beads.

Bead cones serve a number of purposes in jewelry making. They can be used as end pieces to neatly bring together multiple strands to attach to a clasp. They can also be used as bold bead caps or as an end of a dangle or fringe.
Memory wire for bracelets.
Memory wire is used to make bracelets and necklaces. The wire is stiff, so it holds its shape well. It comes in different thicknesses and different colors. You can see memory wire of different diameters in the stores. Today we will use a bracelet wire and the diameter of the coil must be 6 cm.

Beads of the suiting size. The beads must fit inside the nylon mesh tubing. I have pearl beads with a diameter of 8 mm.

Think right away about what kind of bracelet you are going to make. You can make a bracelet with one, two, three… coils around the wrist. Decide on this at once.
Measure out the amount of memory wire you need, then cut it off. It is better to use big wire cutters, the kind that electricians use. Memory wire is very hard, you can damage your jewelry cutters right away if you use them. So, it’s advisable not to use your fragile jewelry cutters but use wire cutters instead.

Do not cut the nylon mesh tubing at once. Put the memory wire through it first and then cut off the desired length of nylon mesh tubing.

On one side, tie a nylon mech tubing with string, thread or thin wire.

Put on the bead cone. I also added a small bead.

Take large round pliers and make a loop on the end.


On the other side, alternately thread the beads on the wire inside the nylon mesh tubing.

Add as many beads as will fit on the wire. Tie the nylon mesh tubing with string or thin wire.

Put on a bead cone and a bead on the wire.

And make a loop at the end of the wire. You can use large round pliers for this.

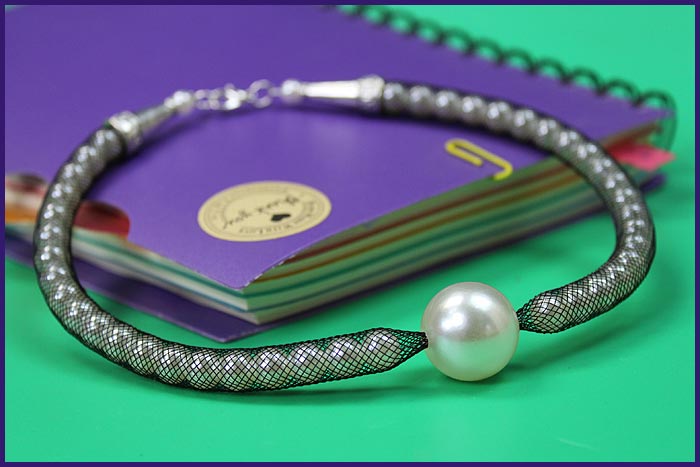
Another fancy nylon mesh tubing bracelet is done!

Nylon mesh tubing bracelets look amazing! It’s easy and inexpensive to work with nylon mesh tubing. And what’s the most important is that this fascinating activity is not very time consuming. This will entertain not only you but also your children and grandchildren.
Good luck on your creative journey!
See related posts

Wire wrapped tutorials Valeriy Vorobev

Valeriy’s Blog Wire wrap tutorials free

