Wire Wrapped Key Pendant Tutorial free. How do you make a key wire? DIY Jewelry Making for Beginners : Wire Wrap Key Pendant.
Today we will make a Wire Wrapped Key Pendant of copper wire and stone with our own hands.

To make the Wire Wrapped Key Pendant we need some tools.
Table of Contents
We do not need many tools. A small set of hand tools will be enough.
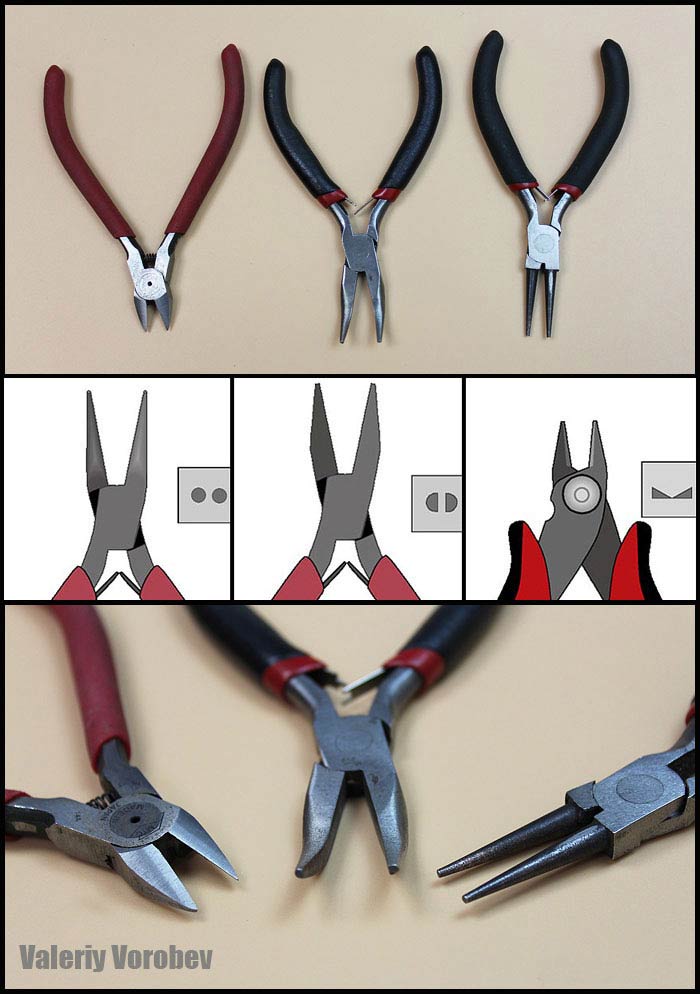
I strongly recommend buying rubber-tipped pliers (with silicone tips), if you don’t already have one. This is an indispensable tool for wire weaving.
If you want to completely copy my Wire Wrapped Key Pendant you will also need a regular gas torch, which you can buy at almost any store near you.

If you will be using natural copper wire for your jewelry and want to patinate and polish the copper you will need an additional tool that I will tell you about at the very end of the master class.
To make the Wire Wrapped Key Pendant we need materials.
We will need a copper natural wire with a thickness of 1 mm and 0.4 mm. Copper wire can now be purchased at online stores.
Needless to say, you can use any wire to make a Wire Wrapped Key Pendant of appropriate thickness. I prefer to use a natural wire (copper, nesilver, melchior, brass, bronze and silver). I like to plow, twist, patinate and polish the wire. A sprayed wire is not suitable for such work.

To make the Wire Wrapped Key Pendant we need a flat oval bead with a hole. I took a natural agate bead about 25 by 18 mm. I recommend using natural stones or glass for your wire jewelry. We work with wire, use metal tools and use chemical solutions – so plastic beads can easily get damaged in the process and all your hard work will go to waste.
Wire Wrapped Tutorial : How to make Wire Wrapped Key Pendant of wire with your own hands.
We need three pieces of 1 mm thick copper wire about 30-40 cm long. You should always have enough fine wire of 0.4 mm thickness. You need a lot of thin wire to make wire jewelry.

Let’s make a loop for the cord or necklace on the pendant. Take one piece and twist one time with round pliers in the middle of the wire. The size of the loop for the cord should be made taking into account the thickness of your cord.

Take pliers and carefully unfold the loop across.

Weave all three thick wires together. Use any method of weaving. Weave to both sides of the loop: to left and right.

We need to weave until the holes in the bead.

Bend the weaving around the edge of the bead. Now we are going to attach the bead to the pendant.

Slip one end of the thin wire into the hole in the bead.

Wrap around the weaving and slip it back into the bead hole.

Tighten the wire. Continue weaving in both directions.

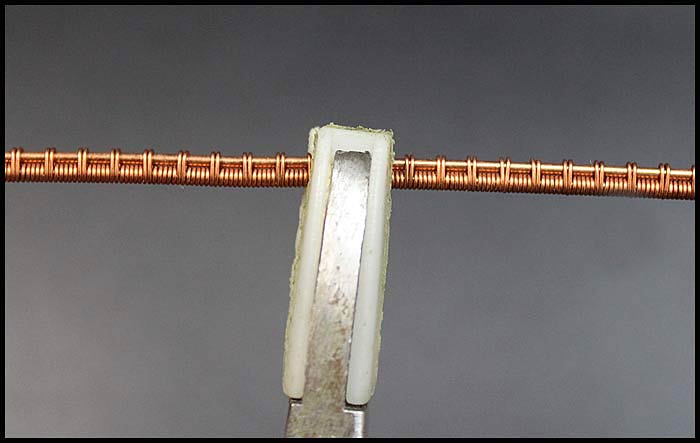
Next: weave and bend, weave and bend. I usually bend the weavings with my hands. You can use rubber-tipped pliers (with silicone tips).

Don’t forget to tighten the weaving with silicone pliers. The weavings will spread over the wire while it is being bent but you should keep them tight. All the coils must fit tightly together.


I separated the weaving. I decided to clamp the bead with a weaving of two wires so that it would not twist.

Arrow 1 – I sewed the weaving to the bottom one. Arrow 2 – I hid the ends inside, under the weaving. Arrow 3 – I put the single wire inside.

On the reverse side. I sewed the ends of the wire with the same thin wire, so they wouldn’t dangle. I also fastened the single wire to the weaving.

In addition, I pressed the bead with a single wire and sewed it to the loop. I bent the end into a spiral.

We are done with the upper part of the Wire Wrapped Key Pendant. Let’s continue our work and complete the key.

Cut off the excess wire.

You can cut off the wire, sand down the ends and leave it that way. I’ll do it differently, I want to make balls on the ends of the wire. Spread the wire apart to make it easier to melt the wire with the gas torch.

Use a gas torch to make balls on the ends of the wire.


Grind the wire and balls with files or sandpaper to remove the soot and roughness.

Continue weaving the wire to the end of the key.


Patination and polishing of copper wire.
Usually, I patinate in two ways – in ammonia vapor or with special ready-made solutions, which I buy in an online store. Be sure to read the instructions for these solutions. Usually, the whole process of patination is described in detail in the instructions.
Most often I patinate copper in ammonia vapor (to make it look old). I often buy ammonia in a pharmacy (in Russia). Pour the solution into a glass jar with a lid. I hang the jewelry on a wire over the ammonia solution. The jewelry piece should contact with the liquid. The copper is patinated in the ammonia vapor. The solution can be used several times. Keep the ammonia in a tightly closed container.

Popular post: Wire weaving tutorials free. Wire Wrapped Stone Pendant diy.
If the ammonia solution is fresh, the copper will darken fairly quickly. After you reach the desired result, take the product out. Be careful with the ammonia, and take all precautions!
After the copper is patinated, you can immediately begin polishing. For polishing, I use manual electric grinders. I use special felt tips and polishing pastes.

After polishing, the jewelry should be rinsed well under running water. I use a toothbrush with liquid soap. Dry the jewelry naturally – without any fans.
To prevent the copper from darkening over time (and trust me – it surely will darken), the entire jewelry can be coated with a special colorless varnish. Just dip the entire ornament in varnish, then dry it hanging it somewhere.
That’s it, our Wire Wrapped Key Pendant made of copper wire and stone is ready! Congratulations to all of us on our victory.

Popular posts:


Wire wrapped tutorials Valeriy Vorobev
Wire wrapped key pendants tutorials PDF