Braided cotton bracelets. How do you make a bracelet out of a cotton cord? Macrame Bracelet Tutorial. 3 Braided bracelets diy.
Very bright and original braided bracelets have become quite popular recently, both among children and adults. A variety of braiding methods and colors allows you to create an elegant thing using interesting details such as beads and various pendants. And the pleasure gained from the process of work, will lift your spirits for the entire day. In addition, handicrafts made by your own hands, carry positive energy.
If you have a desire to create this colorful accessory, read the article below. It offers you several schemes of braiding jewelry.
Braided cotton bracelets are made of cotton cords and can be made monochrome and colored. All the materials can be purchased in stores. The origin of this type of craft lies in the macrame braiding technique.
Those who have never created bracelets made of the cord are advised to start with the simplest models. They are no less attractive than the complex braiding. Even a child can cope with them.
Simple knots are used in the work. It will take not much time to make braided cotton bracelets using the most ordinary base, but the result will be awesome.
You can make these bracelets from any kind of twine or mouline thread. We will fasten a button or bead on our braided cotton bracelet. It will make it easier to take off the bracelet from your hand. These fun little bracelets are proof that even gorgeous crafts can be simple!

In my lessons, I use 2 mm thick cotton cord.
Macrame Bracelet Tutorial 1.
Table of Contents
I think that it’s the right time to start knotting! This bracelet is made with only one fundamental knot, the square knot (a.k.a. half knot).

Take 2 pieces of twine, each about 150 cm long. This will be a little more than you need, but it’s better to have a little more than not enough. The twine can be one color, but I like to make them in two different colors.

Divide each piece into two pieces of 35 and 115 cm long. Tie a knot at the top making a loop. This loop will serve as your button fastener. So make sure your button goes through this loop easily.
Usually, everyone makes a loop of two cords. I don’t like that option, it’s harder to take off the bracelet this way. I prefer to make a button fastener out of one cord.

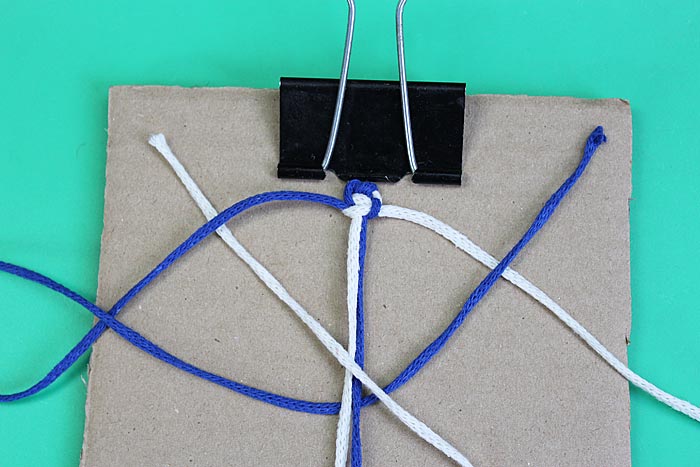
Now anchor your bracelet to your work surface to keep it taut while you work. You can also anchor it with a pin. As for me, I use cardstock with a clip.

Let’s start knotting the bracelet. My explanations may seem a little confusing to you. But I tried to make the pictures step by step. In addition, I made a video tutorial for you as well.
The first thing you have to do is to place the left cord as shown in the photo.

Next, place the right cord as shown in the photo below.

Tighten the knot. You should consider that the tighter the cord is pulled, the smaller the knot will be. Just try to find the size that you like. Maintain the same tightness throughout the project for consistency.


Now take the right cord and place it as shown in the photo below.

Next, work with the left cord.

Tighten the knot.


Next, let’s work with the left cord…

Next, the right cord.

Tighten the knot.


I hope you have already understood the sequence of knotting.
A little hint: pay close attention to which side you are working with. After a knot is pulled tight enough, remember that the side to be worked on next is the side with the cord facing forward, and not the cord facing the back. If you continue knotting from a single side, instead of alternating sides, you will create a half-knot spiral instead. It is also known as spiral stitch This is a different technique and we will learn it in the other lessons.

Make the desired number of knots. It all depends on the size of the bracelet you want.
Tie a button in any way you like. Tie the extra ends of the cord in knots with each other. You can add a drop of glue to the knots to prevent them from unknotting.

The first Braided cotton bracelet is ready.

Macrame Bracelet Tutorial 2.

We will use a cotton cord with a diameter of 2 mm. As in the first tutorial, we will do everything exactly the same.
Begin making the knot on the left side.

Then, on the right side.

Tighten it up.


I have already told you that if you keep knotting from a single side, instead of alternating sides, you will make a half-knot spiral instead. It is also known as spiral stitch. This one is a very cool knot. It also can be used to make braided cotton bracelets. Just remember that it looks different. It has more dimension and doesn’t lay flat.

Let’s measure and tie a button.

Macrame Bracelet Tutorial 3.
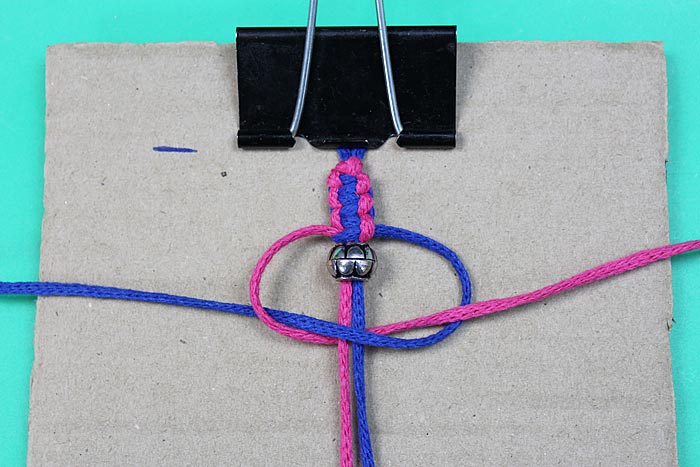
In this tutorial, we will add some beads to the first bracelet. Keep in mind there should be two cords going through the bead hole.
We will use a 2 mm diameter cotton cord.

Make a loop so that the prepared button fits.

Fasten the button and begin to make knots as we did with the first bracelet.

After knitting your first bracelet, you will be able to calculate the right location of the beads on the bracelet.
Thread the cords through the beads and continue knotting.


Next, everything should be done as I described in the first lesson.


And add a button fastener.

Braided cotton bracelet is ready.

Once you’ve mastered the square knot, these bracelets will become very easy for you to make. It won’t be as time consuming as it was and you will be able to add some variations to your braided cotton bracelets.
See related posts
Wire wrapped tutorials Valeriy Vorobev


