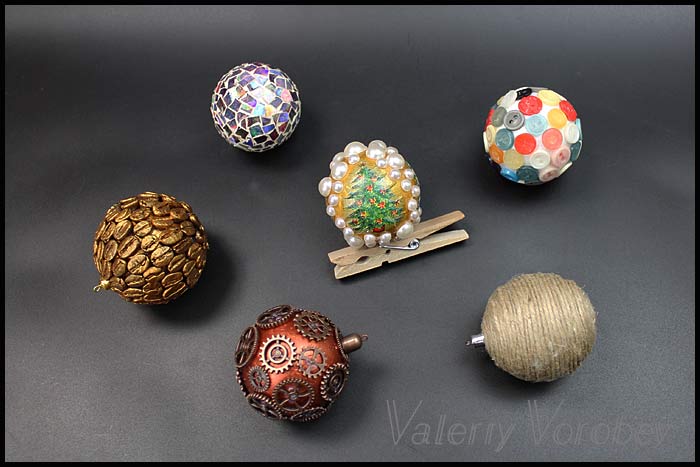
6 DIY Christmas ball ornaments. How to Make a Christmas Ornament of a Styrofoam Ball?
How to make 6 incredibly easy DIY Christmas ball ornaments of styrofoam ball. Christmas decor.
Tools and materials.
Table of Contents
Today we will make six DIY Christmas Ball Ornaments from available material. You can ask your children for help, their creativity can help you. Thus you can create New Year’s crafts together. These days styrofoam balls can be purchased in stores or ordered online. Each polystyrene foam ball should be about 2 inches in diameter.

The main tool for work is a hot glue gun. It is an irreplaceable tool for all kind of masters and creators.

We also need paints, varnishes and water-based glue (acrylic)! Everything besides water glue will just spoil the styrofoam balls. Take my experience as an example. I’ve tried to use Moment glue but it burns holes in the balls like it is an acid.

In order to make the eyelet for the Christmas balls, I used accessories for making jewelry. Cord end pieces and caps for beads and pins will work for us.
DIY Christmas Ball Ornaments made of styrofoam ball and buttons.
There is a certain number of buttons in every home. But if your home is an exception, just go to the nearest store and buy some buttons.

Paint the styrofoam ball with any acrylic (water-based) paint. Fasten the loop. By the way, there is an easy way to make a loop of thread. You can use a needle to pull the thread through the ball. Use a glue gun to attach the buttons to the ball.

DIY Christmas ball ornaments made of the styrofoam ball and CD disc.
We will use an old disk. Just cut it into pieces and glue on the ball. But don’t forget to paint the ball before. Paint it the color you wish. Then, let’s make a loop. It is better to fix the pieces of the disc using PVA glue. First, cover a small area of the ball with glue. Then, you can attach several pieces at a time.


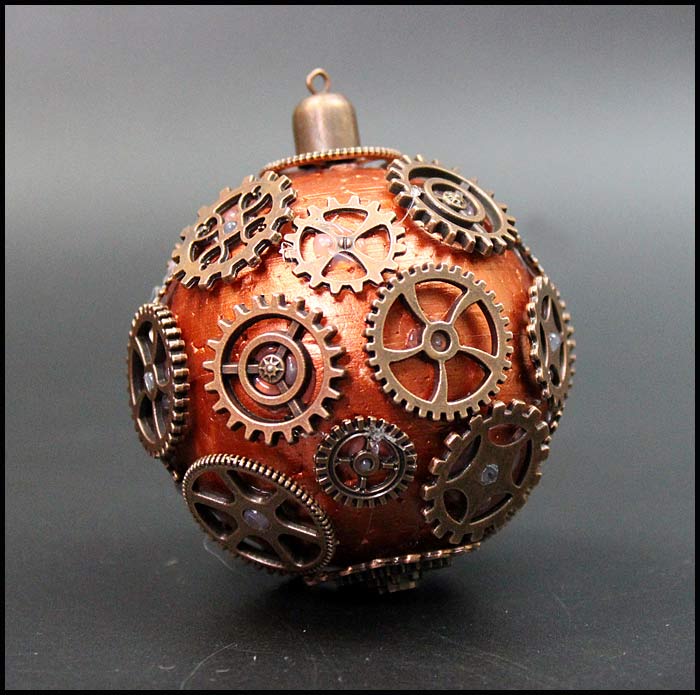
DIY Christmas ball ornaments made of styrofoam balls and gears.
I bought several copper gears just to add some creativity to our work. I bought a set of gears of different sizes and appearances. Then, I painted them with acrylic metallic paint. I chose a copper color. After that, I attached them to the styrofoam ball with a hot glue gun. Make a loop of a pin and a cord end piece.

Christmas Ball Ornaments made of styrofoam ball and twine.
I attached the twine in the same way. I used a glue gun. It is better to work with one half of the styrofoam ball at a time. Cover it with the cord only up to the middle. Then just cut the cord. After that, turn it and work with another half. Cover the ball with the cord up to the middle. Ultimately, you will meet the cord from another side. It will be perfectly seamless if everything is done carefully. You can decorate the Christmas ball with cute pins decorated with balls at the ends. Just glue them to the ball in random order.


Christmas ball ornaments made using coffee beans.
DIY Christmas ball ornaments made using coffee beans.
The process is extremely simple here. First, we should make a loop using a pin and a cord end piece. Then, glue coffee beans on the surface of the styrofoam ball. If necessary, paint the DIY Christmas ball ornament.


DIY Christmas ball ornaments made using the decoupage technique.
We need a multi-layered decoupage napkin (a regular two-layer napkin is okay as well). It should have any kind of a pattern on the surface. First, paint the ball white. Separate the layers of the napkin because we need only one layer. I mean the one that has an ornament. Then glue the napkin on the surface of the ball. If necessary, paint the ball again. It would be nice to cover the ball with colorless acrylic varnish. I tried to come up with something creative. So I also glued rhinestones on the ball with a glue gun. And finally, glue the Christmas ball to the clothespin! Yes, you got it right. We will attach the ball to the tree with a clothespin!


Watch the video tutorial.
Pin the Pin below as a bookmark to your Pinterest board!

Popular posts

Wire wrapped tutorials PDF Valeriy Vorobev