Polymer clay for beginners. What is a polymer clay? Polymer clay bake temp. Jewelry with polymer clay. Necessary tools for modeling with polymer clay.
What is polymer clay
Table of Contents
Polymer clay is a plastic material that resembles plasticine in its cold state. It is used in the same way as plasticine to model miniature objects (flowers, jewelry, beads, sculptures, dolls, etc.) and modeling. It hardens after baking at temperatures ranging from 100 degrees to 150 degrees Celsius (depending on the manufacturer).
Therefore, products made of polymer clay are durable and can withstand more severe stresses, compared to plasticine. Other names for polymer clay are thermoplastic and plastic. The material is environmentally friendly and safe. It has already passed some serious tests and has been approved for activities with children from the age of three. So, as you have already noticed polymer clay for beginners is a very simple subject.

Jewelry made of polymer clay turns out very naturalistic, the material is very flexible and has great potential for the realization of very diverse ideas. Therefore, creativity with polymer clay has gained wide popularity in different areas of arts and crafts. That’s why different tutorials about polymer clay for beginners are so widespread today. So, it is used for making:
- Elements of interior decor;
- Souvenirs and bijouterie;
- Floristic compositions;
- Christmas tree decorations and toys;
- Homemade dolls.
Thermoplastic allows you to make very accurate and subtle sculptural elements so that you can create an imitation of a variety of textures and structures of other materials.
The work with thermoplastic is not difficult, and the techniques that are used are very accessible. Therefore, considering how stunning the results of thermoplastic handicrafts are, it is not surprising that it has won many fans and brought them additional income. Many use this hobby as a source of permanent income. So now, the topic of polymer clay for beginners may have become even more interesting for you.
Polymer clay instruction.
Before modeling, polymer clay should be prepared – you should knead it so that it becomes soft and flexible. That’s why it should be heated with your hands – try to knead it for a while, then smooth it, so that it becomes thin enough to be processed by a special machine.

If there is no such machine, you can prepare the thermoplastic by hand – repeatedly rolling out and again crumpling it. You can also heat it, using a hairdryer or heat lamp – so the thermoplastic “relaxes” and becomes malleable.
Polymer clay for beginners. Color shaping.
Brightness and color variety are some of the most attractive features of thermoplastic. It comes in a huge number of colors and shades, it can also be mixed in different combinations to get the desired shade. If you learn how to mix different colors of thermoplastic, you can even achieve imitation of expensive materials. Polymer clay for beginners can be a very interesting thing if you dive deep enough into it.
Giving shape to polymer clay.
Thermoplastic allows you to use a wide variety of ways to shape it. It can be cut and carved, weaved, “ruffled” or flattened, textured or stamped, and so on. Work with thermoplastic at the shaping stage is best done on ceramic tile or wax paper – their surfaces are ideal for this. One of the most creative ways of shaping products is the “Kaleidoscope” technique, in which picturesque products are created from different patterns which are then cut.
How to bake polymer clay
After the product takes the desired shape, it must be baked so that it hardens and becomes ready for use and long-term preservation. Bake the thermoplastic in a regular oven on cardboard or parchment paper, you can also bake on a ceramic tile or metal tray (but in this case the bottom of the product can get covered in shiny spots). When baking, the oven should be heated to 120 degrees first, and only then you can bake thermoplastic. Bake it for 0.5-1 hour at temperatures from 120 degrees to 130 degrees (depending on manufacturer recommendations).

Keep in mind, however, that thermoplastic can melt if overheated or produce toxic smoke. Therefore, it is important to carefully monitor the heating temperature with a reliable thermometer and ensure good ventilation of the work area. Although Polymer clay for beginners seems simple but never forget about precautions.
Polymer clay finish
To make your clay creations look even more attractive, after baking and cooling, they can be sanded with sandpaper. They can also be painted and varnished. And a light coating of transparent sealer will perfectly protect the clay surface and give it a shine. There are many secrets in polymer clay for beginners and I will be happy to tell you about all of them.
Additional materials for making polymer clay jewelry.

To completely make thermoplastic costume jewelry, you’ll need to stock up on sandpaper to sand the pieces, especially if you’re making beads. The sanding is done after baking and before varnishing. The sandpaper should be water-resistant, grit from 400 and up to 1200, it should be made on a paper base, because the cloth-based sandpaper is too coarse. After sanding, the beads are rubbed with a linen cloth, which gives them a nice velvety feel. The beads are also waxed. After sanding, the beads feel so different when you touch them – even compared to those coated with varnish, because the varnish does not hide the defects, but only accentuates them more. Polymer clay for beginners is simple but there are several aspects you need to pay attention to.
If you are going to make costume jewelry, make sure you have all the accessories you need: earring blanks, rings, brooches, clasps, chains, monofilaments, cords, pins, hooks, etc.
Types of polymer clay. Best polymer clay.

Thermoplastic is available today from a variety of manufacturers. It can be bakeable and self-hardening. We will talk about bakeable thermoplastic. Almost every manufacturer has different degrees of hardness.
The first and best known today manufacturer of thermoplastic is the company FIMO. The company’s products are considered classics. It produces three varieties of thermoplastic: Professional, Soft and Effect. They differ greatly in their characteristics and colors. “Soft” – the softest type. It has a wide range of colors, it is suitable for any molding techniques, after baking the color remains almost unchanged (only the brightness of semi-transparent shades increases and translucent white acquires a gray shade when formed in a thick layer). “Effect” has a special structure with different effects: translucency, with glitters and nacre. It may sound complicated but don’t worry, Polymer clay for beginners is much simpler than you think.
“Professional” is a hard type of thermoplastic, it is excellent for fine work (jewelry making). It has high plasticity and weak resiliency, so that fingerprints or defects are clearly visible on it.
The thermoplastic from Premocompany has a comfortable consistency for molding, it is a little waxy, excellent for sausages. It is not too sticky and retains its shape much better than Fimo “Soft”. It can be stored for a long period of time very well. Its palette includes clean, basic tones, allowing plenty of room for self-mixing colors while maintaining maximum color saturation. After baking, it has a completely matte surface.
Cernit is a Belgian-made polymer clay. It has a high density, so before sculpting it must be kneaded for a long time, like wax. And when it is kneaded enough it is very soft. When baked, it changes color significantly and acquires transparency. It is especially good for creating doll faces (because of its “porcelain” look). Special types are produced (even an entire series) which are imitating stone ( for example, marble) and other natural textures. A transparent thermoplastic Cernit is one of the most transparent.

Kato Polyclay is thermoplastic from American manufacturer. It is baked at the highest temperature compared to all other types (150 degrees Celsius). It also has considerable hardness and is kneaded with a hammer. Due to its hardness, Kato is very suitable for sausages: it fixes fine lines well and does not let thin layers mix. In addition to hard thermoplastic, Kato also produces liquid thermoplastic – Kato Liquid Polyclay. It is characterized by high durability combined with flexibility: the baked products can be cut into desired shapes with scissors. It can be transparent and colored. The palette includes six bright transparent colors and two matte, which are easily mixed with each other and with decorative additives (such as mica powder or glitter). Using it, you can make amazing stained glass and mosaics, as well as glass, stone and watercolor effects. It is often used as an adhesive, a grout, and a glaze.
We have named the main and most well-known brands of thermoplastics, although these are not all on the market. As you can see, the basics of Polymer clay for beginners are very easy to memorize, so let’s go further.
Necessary tools for modeling with polymer clay.
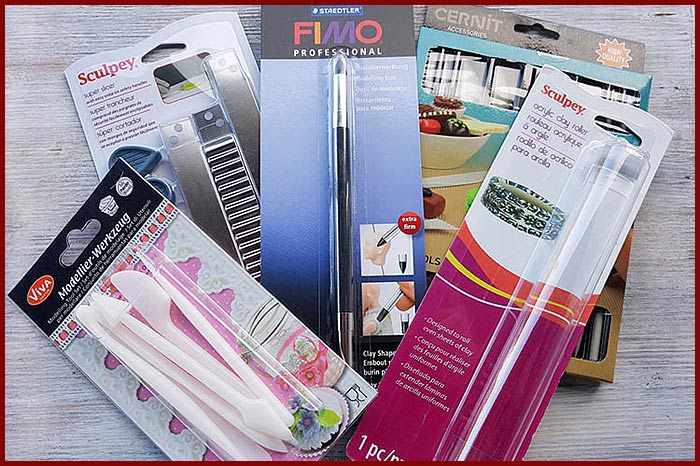
You will need the following tools to work with thermoplastic:
- A very sharp knife (utility knife or special knife): it must not smudge the drawing when cutting.
- A rolling pin or an acrylic roller (you can also use a metal tube, a deodorant aerosol bottle, a crossbar from a closet, a bottle or a smooth cylindrical glass).
- Paste machine.
- Toothpicks (to roll slices, to prick elements while working with miniature elements, and also to make holes inside beads).
- Shaper – for sculpting.
- Beautiful buttons or pendants which you can use to copy designs.
- Rubber or silicone texture sheets.
- Moulds (some kinds of lids are also okay), they are used to cut out the desired shapes.

In addition to tools, when working with thermoplastic you can use any little things: glitters and sprinkles, cosmetics and pastels, colored glass and beads, a variety of other decorative elements, various paints and plenty of things that will help decorate your work. So, getting familiar with Polymer clay for beginners you can use literally anything you have at home.
Polymer clay crafts ideas
Of course, thousands of wonderful handicrafts are made of thermoplastic. But still, some kinds of items are especially good when using thermoplastic. So it’s difficult to use any other materials to create something similar. Let us look at such examples.

- Flowers. First of all, I’m talking about roses. You can use such flowers to make brooches, to decorate hairbands, hairpins, bracelets, rings, beads. You can also make some delicate flowers, similar to apple or apricot flowers, orchids, snowdrops, etc.
- Beads. Thermoplastic beads with a metallic effect are awesome. They are used to assemble bracelets, earrings, necklaces, etc.
- Cones, berries. They are used as decorative elements, like flowers.
- Necklaces. You can make them massive, ethno-style or elegant. Beads are placed on the necklace along with other decorative elements. Fix them to the base with special glue or transparent fishing line.
- Figurines of animals. They can be placed on a hairpin or a brooch or pendant.
- Bracelets weaved from thermoplastic. Several bracelets worn together look especially beautiful.
- Cutting of different colored clay sausages. Unique decorative elements are made of multilayered sausages of multicolored clay, when slices of different sections are cut from the sheets of clay twisted into tight rolls.
Now, my friends, you know almost everything about Polymer clay for beginners, I hope it was a pleasure for you to dive into such a wonderful world of polymer clay.
See related posts


Wire wrapped tutorials PDF